Content Calendar
View and manage all your scheduled posts in one place.
The Content Calendar is your bird's-eye view of everything scheduled across all your connected accounts. Instead of wondering "what's going out this week?" or checking each platform separately, you can see your entire content plan at a glance.
Navigating the Calendar
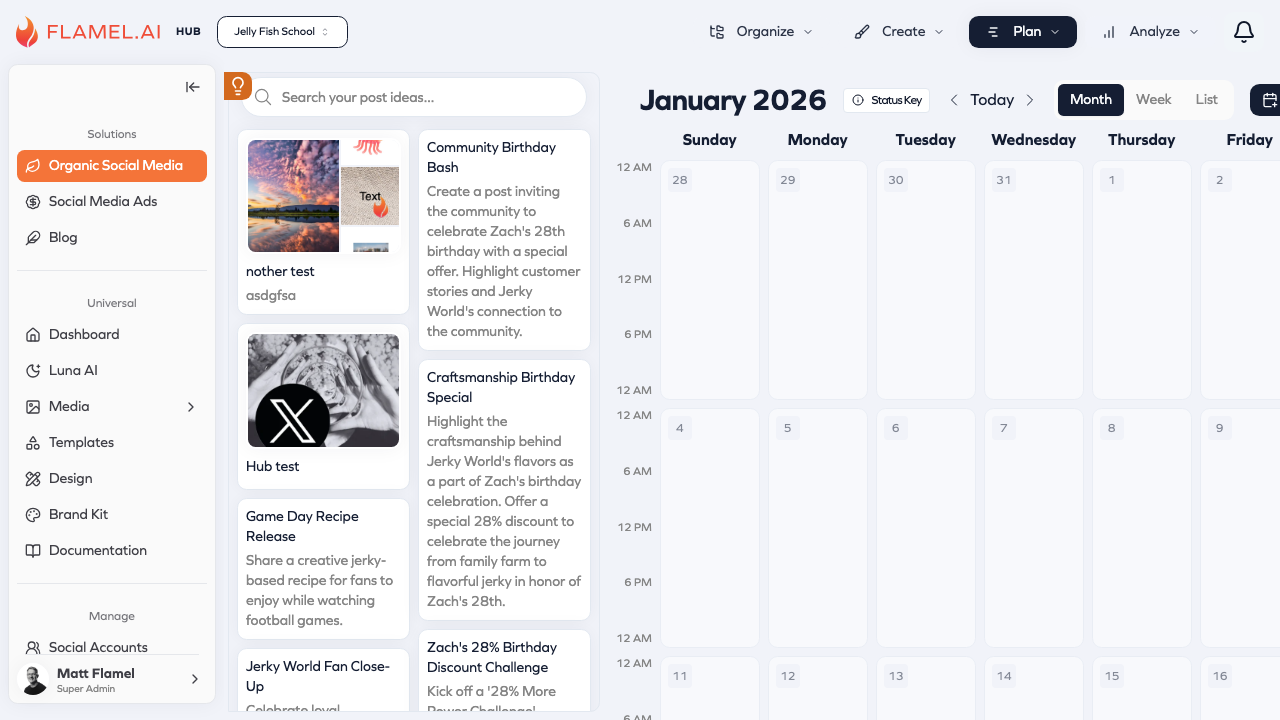
From the Organic Social module, click Plan > Calendar in the top navigation to open your calendar. You'll see three view options at the top:
Month view shows an entire month at once. Each day displays the posts scheduled for that day as small cards. This is great for planning and spotting gaps in your content schedule.
Week view zooms in to show seven days with more detail. You can see the actual times posts are scheduled, not just the day. This view is helpful when fine-tuning your posting schedule.
List view presents posts in a scrollable timeline. It's the most detailed view, showing the full content of each post along with its scheduled time and target accounts.
Understanding Post Status
Posts on the calendar are color-coded so you can quickly see their status:
| Color | Status |
|---|---|
| Blue | Scheduled and waiting to publish |
| Green | Published successfully |
| Red | Failed to publish (needs attention) |
| Gray | Draft — created but not yet scheduled |
Red posts need immediate attention. Click on them to see what went wrong (often an expired connection or a platform-specific issue) and take action.
Managing Posts
Click any post on the calendar to preview it or make changes. A sidebar opens showing the full content, attached media, and which accounts it's going to.
From here you can edit the post, change the scheduled time, or move it to a different day. If you prefer, you can also drag posts directly on the calendar to reschedule them — just grab a post card and drop it on a new day or time slot.
To create a new post, click any empty space on the calendar. This opens the post editor with that day and time pre-filled, so you can quickly add content where you spot a gap.
Filtering and Focusing
When you manage multiple accounts or platforms, the calendar can get crowded. Use the filter options to focus on what matters:
Filter by account to see posts for just one or a few of your connected accounts. This is useful when you're focused on a specific brand or franchisee.
Filter by platform to see only Instagram posts, only Facebook posts, etc. This helps when you want to ensure consistent posting frequency on a specific platform.
Hub users can filter by workspace to see what each franchisee has scheduled. This is helpful for reviewing local content across your franchise.
The Calendar and Hub Broadcasts
If you're part of a Hub network, you'll see both your own posts and broadcasts from your Hub on the calendar. Hub content appears with a distinct marker and is read-only — you can't edit or reschedule it since it's managed at the franchisor level.
This gives you visibility into everything publishing under your brand without mixing up what you control versus what your Hub controls.
Calendar Best Practices
A well-maintained calendar is the foundation of consistent social media presence:
Plan ahead — Try to have at least a week of content scheduled. This gives you buffer room and prevents last-minute scrambling.
Look for gaps — Use month view to spot days with no content. Consistent posting helps maintain audience engagement.
Review before publishing — Each morning, check what's going out that day. Make sure nothing needs last-minute changes.
Use drafts — If you're not ready to schedule something, save it as a draft. It'll appear on the calendar in gray, reminding you to finish and schedule it later.
Time Zones
When you manage locations across different time zones, scheduling gets more complex. Flamel handles this automatically, but understanding how it works helps you schedule effectively.
How Time Zones Work
Your profile timezone determines what you see on the calendar. If you're set to Eastern Time and schedule a post for 9:00 AM, you see 9:00 AM Eastern on your calendar.
Each location's timezone determines when posts actually publish. When you broadcast content to multiple locations, Flamel converts the scheduled time to each location's local timezone.
Example: Scheduling Across Time Zones
You schedule a post for 9:00 AM from your account (Eastern Time) to go to three franchisee locations:
| Location | Timezone | Publishes At |
|---|---|---|
| New York Store | Eastern | 9:00 AM local |
| Chicago Store | Central | 9:00 AM local (10:00 AM your time) |
| Los Angeles Store | Pacific | 9:00 AM local (12:00 PM your time) |
Each location sees the post at 9:00 AM their local time — peak morning engagement for each market.
Setting Your Timezone
Your timezone is set in Settings > Profile. Make sure it matches where you actually work, not where your locations are. This ensures the times you see on the calendar match your local clock.
Tips for Multi-Timezone Management
Think in terms of local time when scheduling for specific locations. Ask yourself "What time do I want customers in that city to see this?"
Use the preview before scheduling broadcasts. Flamel shows you when the post will publish in each location's timezone.
Account for business hours differently by region. 9 AM on the East Coast is 6 AM on the West Coast — if you're scheduling a promotion that starts "this morning," consider staggering by timezone.
Bulk Scheduling
When you need to schedule many posts at once, working one-by-one through the post editor is inefficient. Bulk scheduling lets you upload and schedule multiple posts in a single workflow.
When to Use Bulk Scheduling
- Content calendar planning — Schedule an entire month of posts in one session
- Campaign launches — Prepare all campaign posts ahead of time
- Recurring content — Set up regular posts like weekly promotions or daily tips
- Migration — Moving scheduled content from another tool to Flamel
How to Bulk Schedule
- From the Organic module, navigate to Create > Bulk Upload
- Download the CSV template if you're starting fresh
- Fill in the template with your post content, scheduled dates/times, and target accounts
- Upload the completed CSV file
- Review the preview showing all posts that will be created
- Confirm to schedule all posts at once
CSV Template Format
The bulk upload template includes columns for:
| Column | Description | Required |
|---|---|---|
| Content | The post text/caption | Yes |
| Scheduled Date | Date to publish (YYYY-MM-DD) | Yes |
| Scheduled Time | Time to publish (HH in 24-hour format) | Yes |
| Accounts | Which accounts to post to (comma-separated) | Yes |
| Media URL | Link to media file (optional) | No |
Bulk Scheduling Tips
Start with a small batch the first time. Try 5-10 posts to get comfortable with the format before uploading hundreds.
Double-check dates and times before uploading. A typo in the date column could schedule posts for the wrong month or year.
Use consistent time formats throughout your CSV. Mixing "9:00 AM" and "14:00" causes errors.
Review before confirming — Flamel shows a preview of all posts before creating them. Take a moment to scroll through and verify everything looks right.