Creating Playbooks - Complete Guide
Hub users: build campaign blueprints step by step with this comprehensive walkthrough.
Playbooks let you design advertising campaigns once and deploy them across all your franchisees. This guide walks through every option in the playbook creation wizard, explains what each setting does, and helps you make the right choices for your brand.
Before You Start
Prerequisites Checklist
Before creating your first playbook, ensure:
- You're logged in as a Hub admin (not a workspace user)
- Your workspaces have connected their Meta ad accounts
- You've set up Ads Configuration with audience types
- You have creatives ready (images/videos) if providing hub-level media
The 4-Step Wizard Overview
The playbook creation wizard has four steps:
| Step | What You Configure |
|---|---|
| Step 1: Playbook Setup | Name, access, launch mode, budget, schedule, creative source, questions |
| Step 2: Campaigns | Campaign objectives, structure, and budget allocation |
| Step 3: Ad Sets & Creative | Targeting, audiences, ad creative, and copy |
| Step 4: Review & Create | Final review and launch |
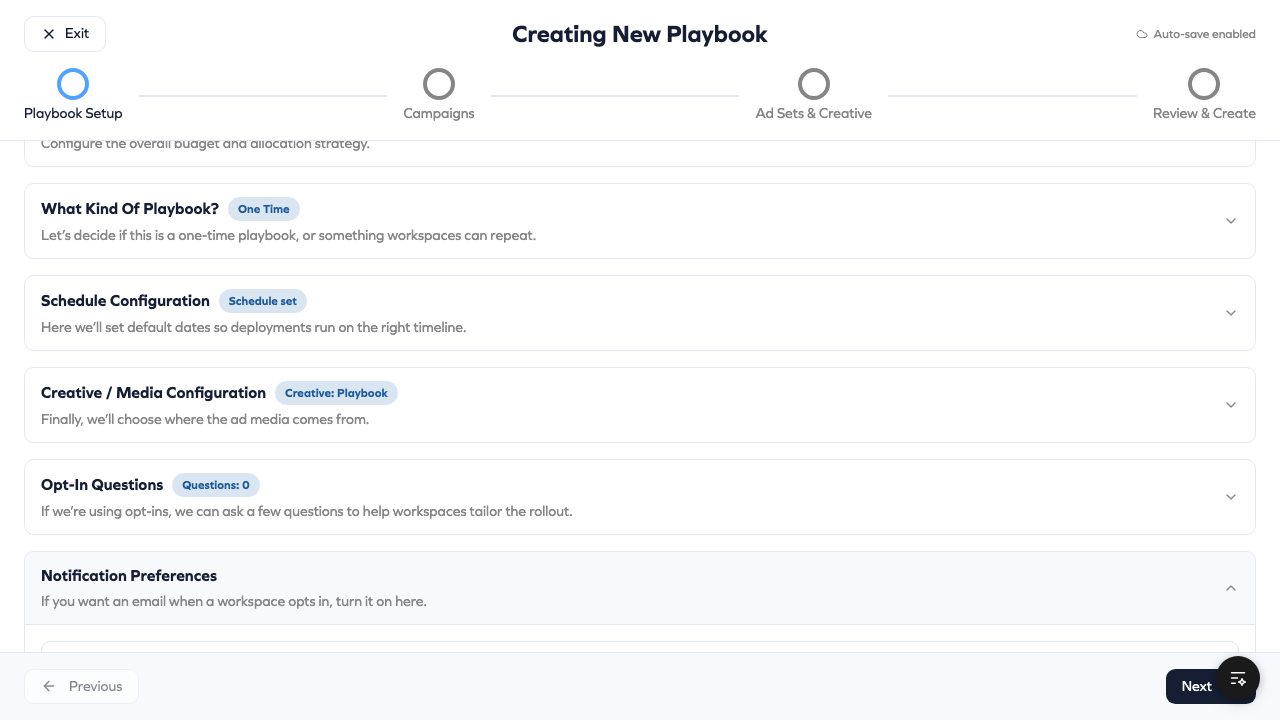
Step 1: Playbook Setup
Step 1 contains nine collapsible sections. Each section handles a different aspect of how your playbook works. You can expand/collapse sections as you work through them.
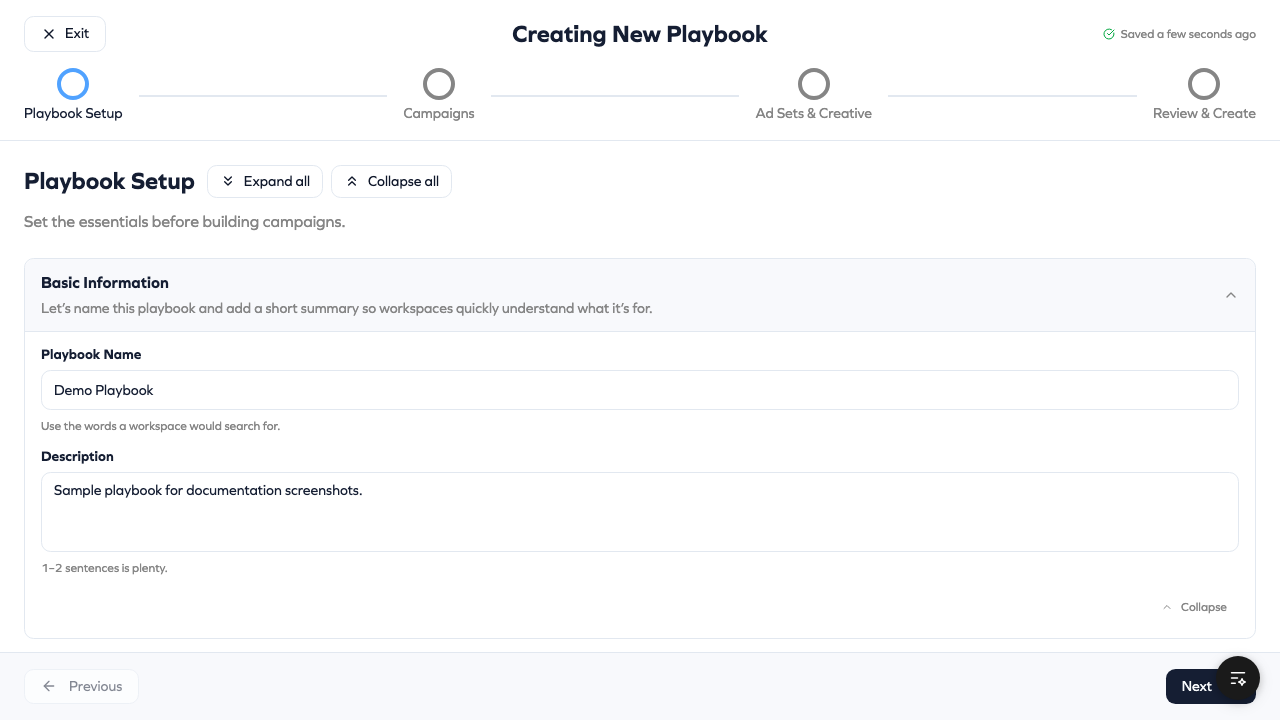
1.1 Basic Information
Playbook Name — The name workspaces see when browsing available playbooks. Choose something clear and searchable.
Use words your franchisees would search for. "Summer Sale - Website Traffic" is better than "Q3 Campaign v2".
Good naming examples:
- "Grand Opening - Local Awareness"
- "Holiday Lead Generation - 2 Week Trial"
- "Monthly Brand Awareness - Evergreen"
- "Black Friday Sale - Traffic Campaign"
Description — A 1-2 sentence explanation of what this campaign does and who should use it. Workspaces read this before deciding to opt in.
Write descriptions that answer:
- What's the goal of this campaign?
- When should it run?
- Who should opt in?
Example: "Drive traffic to your store's website during our summer promotion. Best for franchisees with active e-commerce. Runs for 14 days starting July 1st."
1.2 Who Has Access?
Control which workspaces can see and opt into this playbook.
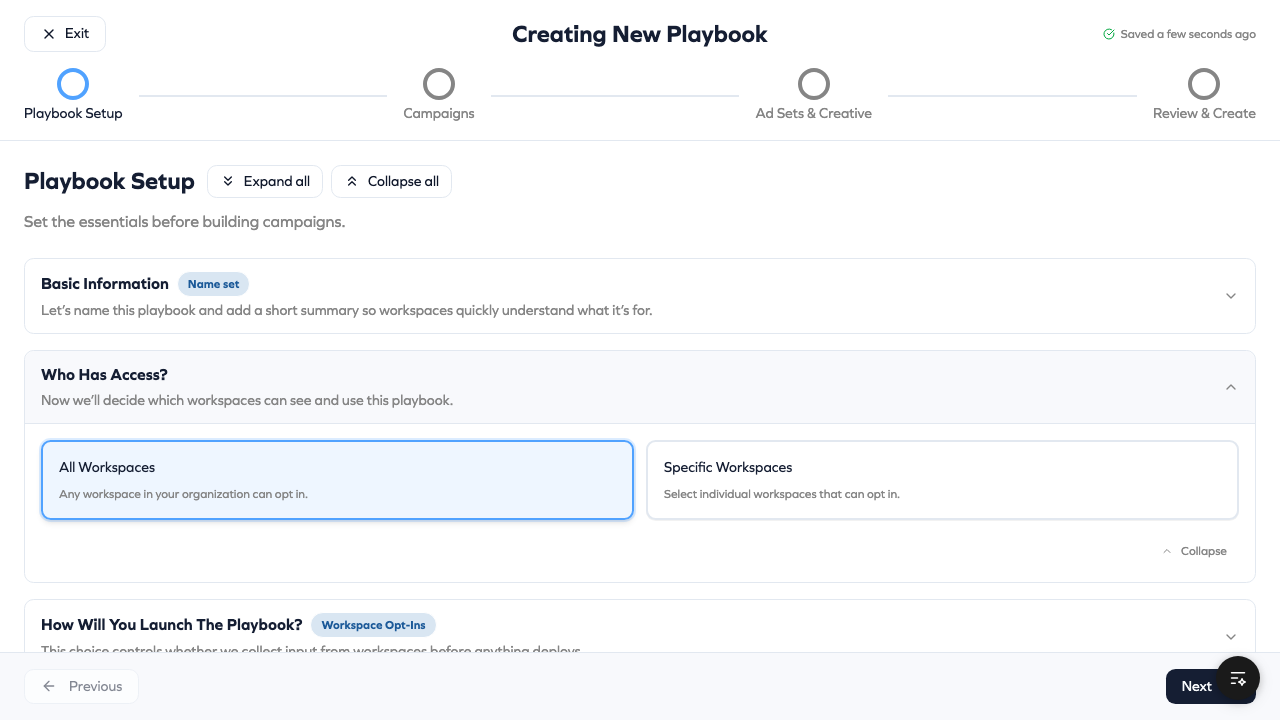
All Workspaces — Every workspace in your Hub can see this playbook. Use this for brand-wide campaigns.
Specific Workspaces — Hand-pick which workspaces see this playbook. Use this for:
- Regional campaigns (only certain markets)
- Pilot programs (testing with select franchisees)
- Tiered rollouts (premium locations first)
When you select specific workspaces, a picker appears showing all workspaces in your Hub. Check the ones you want to include.
| Scenario | Recommendation |
|---|---|
| Brand-wide promotion | All Workspaces |
| Regional campaign | Specific Workspaces (by region) |
| Pilot test | Specific Workspaces (top performers) |
| Premium-only offer | Specific Workspaces (qualifying locations) |
1.3 How Will You Launch? (Critical Decision)
This is one of the most important choices. It determines whether workspaces actively participate or campaigns deploy automatically.
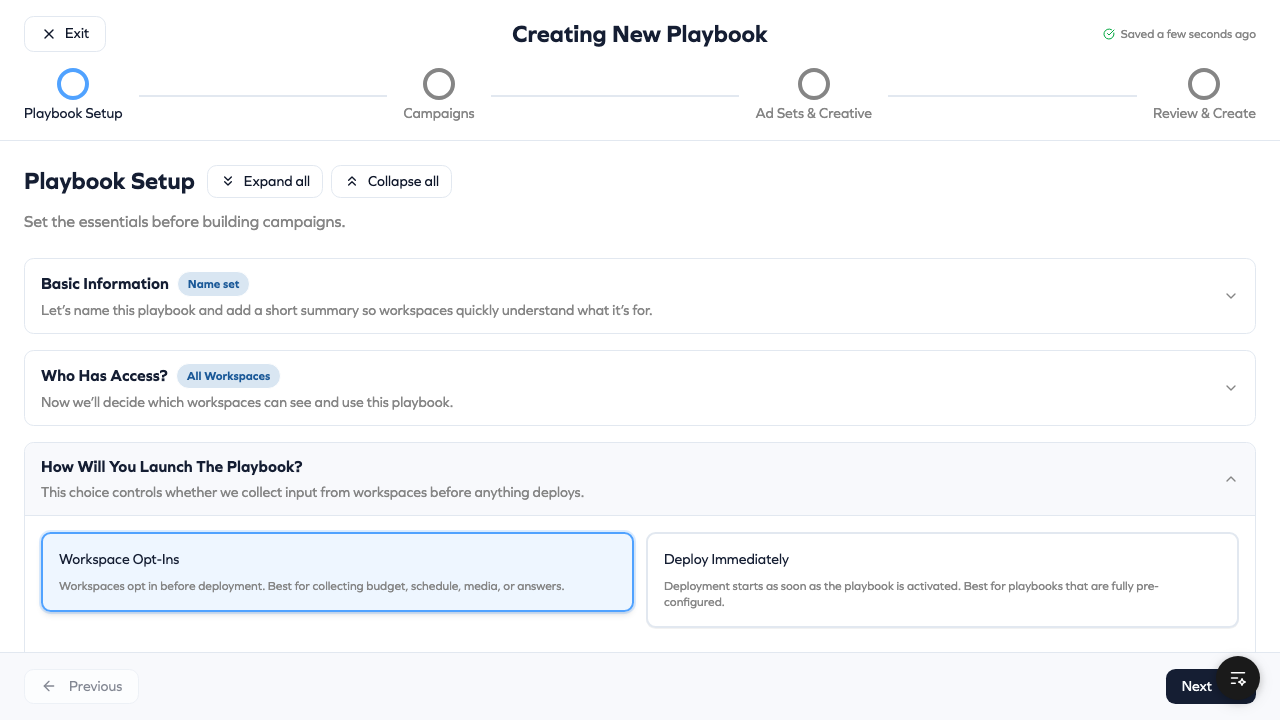
Workspace Opt-Ins
Workspaces must explicitly choose to participate. They browse available playbooks, review details, and click "Opt In" to join.
When to use:
- You need workspace input (budget, schedule, creative, or answers to questions)
- You want workspaces to make an informed decision
- Different workspaces may need different configurations
- You're using workspace-level creatives or boosted posts
What workspaces experience:
- See playbook in their shop
- Review details and requirements
- Provide any required inputs (media, budget, answers)
- Click "Opt In" to deploy
Hub review (for workspace-level creatives): If workspaces upload their own media, you can review and approve before deployment. This ensures brand compliance.
Deploy Immediately
Campaigns automatically launch at selected workspaces when you activate the playbook. No workspace action required.
When to use:
- Playbook is fully pre-configured (you provide all creatives)
- Brand-wide campaigns with consistent messaging
- Time-sensitive launches where speed matters
- Workspaces shouldn't have a choice
Requirements:
- Hub must provide all creatives (no workspace uploads)
- Cannot use "Existing Posts" creative mode
- Budget and schedule must be set at hub level
What workspaces experience:
- Campaign appears in their account already running
- They can pause/resume but not opt out initially
Deploy Immediately is disabled if you select workspace-level creatives or boosted posts, since those require workspace input.
Decision Guide
| Question | If Yes → |
|---|---|
| Do workspaces need to upload their own images/videos? | Opt-In |
| Do workspaces need to set their own budget? | Opt-In |
| Do workspaces need to choose their start date? | Opt-In |
| Are you using boosted posts from workspace feeds? | Opt-In |
| Is everything pre-configured with no workspace input needed? | Deploy Immediately |
| Is this a time-sensitive brand-wide launch? | Deploy Immediately |
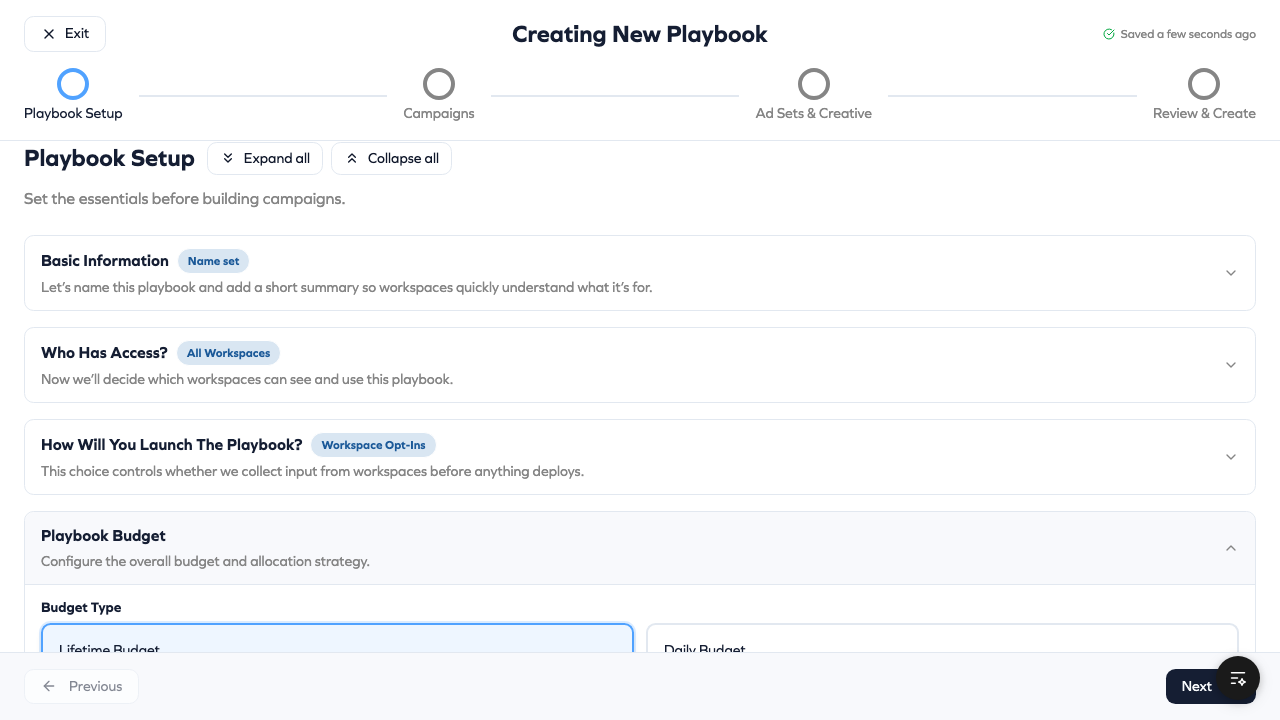
1.4 Playbook Budget Configuration
Set the overall budget that gets distributed across campaigns and workspaces.
Total Budget
The default amount each workspace will spend. Enter a dollar amount (minimum $1.00).
Consider your typical franchisee:
- Market size and population
- Advertising capacity and experience
- Expected return on ad spend
- Competitive landscape
Budget Type
Daily Budget — Amount spent per day during the campaign run.
- More flexible scheduling (no end date required)
- Spend is paced evenly across each day
- Good for: ongoing campaigns, testing, flexible durations
Lifetime Budget — Total amount spent over the entire campaign duration.
- Requires start and end dates
- Meta optimizes delivery across the full period
- Good for: fixed promotions, events, seasonal campaigns
| Budget Type | Requires End Date | Best For |
|---|---|---|
| Daily | No | Ongoing campaigns, flexible duration |
| Lifetime | Yes | Fixed promotions, events, seasonal |
Campaign Allocation
When your playbook has multiple campaigns, choose how to split the budget:
Equal — Divides budget evenly across all campaigns.
- 2 campaigns = 50% each
- 3 campaigns = 33.3% each
- Simple and balanced
Percentage — You specify the split per campaign.
- Must sum to exactly 100%
- Example: Campaign A = 60%, Campaign B = 40%
- Use when campaigns have different priorities
Allow Workspace Budget Control
Toggle this ON to let workspaces adjust the total budget during opt-in.
Enabled:
- Workspaces see the recommended budget but can increase/decrease
- You can set minimum and maximum limits
- Good for varying market sizes
Disabled:
- Budget is fixed; workspaces cannot change it
- Ensures consistent spend across network
- Good for brand-funded campaigns
If your franchisees have very different market sizes, enable workspace budget control and set a reasonable minimum. A location in NYC needs more budget than one in a small town.
Minimum Budget
Optional floor that workspaces cannot go below. Protects against underspending that would hurt performance.
Meta minimums:
- Daily: $1.00 minimum
- Lifetime: $5.00 minimum (across entire duration)
We recommend higher minimums based on campaign objectives:
- Awareness: $10-25/day minimum
- Traffic: $15-30/day minimum
- Leads: $20-50/day minimum
- Sales: $25-75/day minimum
Per-Workspace Recommended Budgets (Advanced)
For sophisticated budget planning, you can set different recommended budgets per workspace based on their market potential.
This is useful when you have detailed knowledge of each franchise's market size, historical performance, or specific targets.
1.5 What Kind of Playbook? (One-Time vs Evergreen)
Choose whether this playbook runs once or can be repeated.
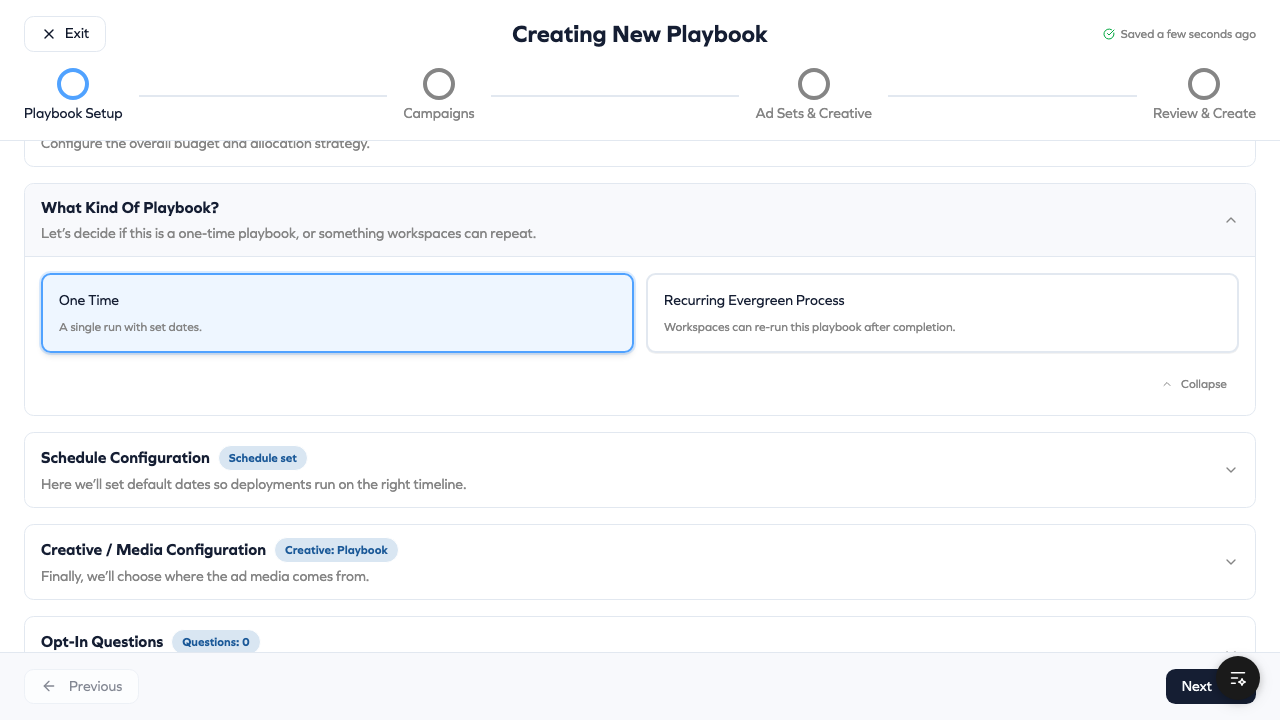
One-Time Playbook
A single campaign run with fixed dates. When it ends, it's done.
Characteristics:
- Hub sets the schedule (start and end dates)
- Workspaces opt in once
- Campaign ends on the end date
- Cannot be re-run without creating a new playbook
Best for:
- Seasonal promotions (Black Friday, Holiday)
- Limited-time offers
- Event-based campaigns
- Product launches
Evergreen Playbook
Workspaces can run this playbook repeatedly. After one run completes, they can opt in again.
Characteristics:
- Automatically enables workspace schedule control
- Automatically enables workspace budget control
- Hub sets duration parameters (not fixed dates)
- Workspaces choose when to run each time
When you select Evergreen, you configure duration:
Preset Duration — Fixed length options:
- 7 days
- 14 days
- 30 days
Workspaces pick their start date; end date is calculated.
Custom Duration — You set the exact number of days.
Flexible Range — Min and max days; workspaces choose within range.
- Example: Min 7 days, Max 90 days
- Workspace decides how long to run
Evergreen playbooks are powerful for recurring needs like "New Customer Special" or "Monthly Awareness Push" that workspaces can launch whenever they want.
Evergreen Re-Opt-In Flow
- Workspace opts into evergreen playbook
- Campaign runs for configured duration
- Campaign completes (status: "completed")
- Workspace can immediately opt in again
- New campaign created with new dates/budget
- Repeat as needed
Each run is tracked with a "run number" (1, 2, 3...) so you can see how many times each workspace has used the playbook.
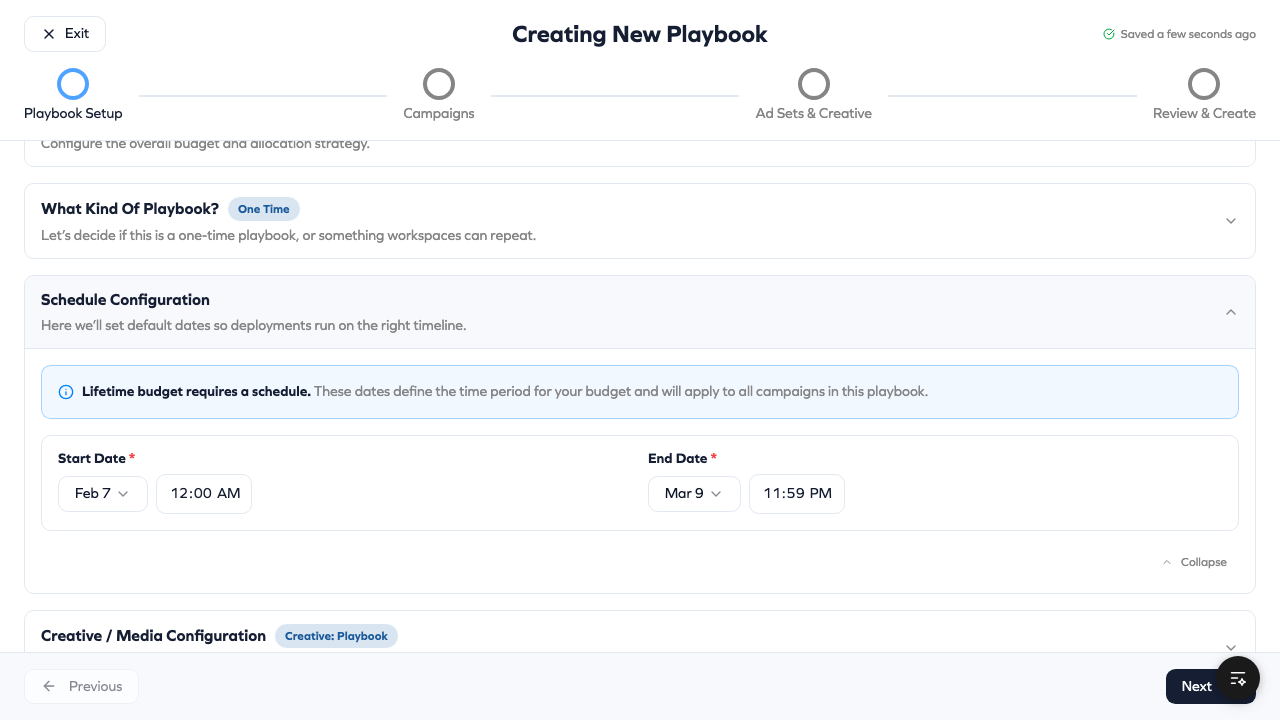
1.6 Schedule Configuration
Set when campaigns run. This section appears for opt-in mode playbooks OR when using lifetime budgets.
Allow Workspace Schedule
Toggle this to control who sets the dates.
Enabled (Workspace Controls Schedule):
- Workspaces pick their own start and end dates during opt-in
- Hub doesn't set dates here
- Good for flexible timing, evergreen playbooks
- Required for evergreen playbooks
Disabled (Hub Controls Schedule):
- You set start and end dates for all workspaces
- All campaigns run on the same schedule
- Good for coordinated launches, brand promotions
Start Date
When campaigns begin. Validation rules:
- Cannot be in the past
- Must be at least 24 hours in the future
- End date must be after start date
End Date
When campaigns stop (required for lifetime budgets).
For lifetime budgets without workspace schedule control, you MUST set both start and end dates. The wizard won't let you proceed without them.
1.7 Creative / Media Configuration
This section only appears in Opt-In mode. Choose where ad creative comes from.
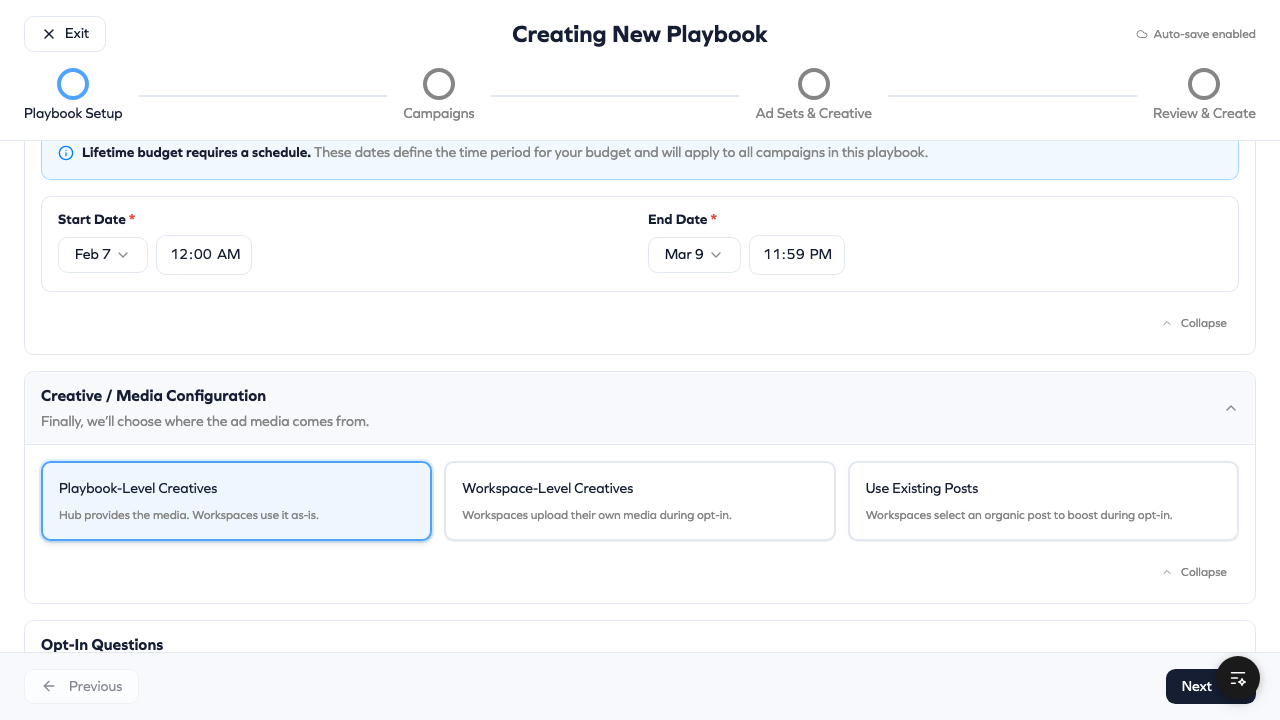
Playbook-Level Creatives (Hub Provides)
You upload all images and videos. Workspaces use your creative as-is.
Pros:
- Brand consistency guaranteed
- Fastest deployment
- Enables Deploy Immediately mode
- No review needed
Cons:
- No local customization
- Generic messaging for all markets
Best for:
- Brand campaigns with consistent messaging
- Professionally produced creative
- Time-sensitive launches
Workspace-Level Creatives (Workspace Uploads)
Each workspace uploads their own images and videos during opt-in.
Pros:
- Local customization (staff photos, storefront images)
- More authentic, location-specific content
- Workspaces feel ownership
Cons:
- Requires hub review before deployment
- Longer time to launch
- Quality varies by workspace
- Blocks Deploy Immediately mode
Best for:
- Local awareness campaigns
- Campaigns featuring specific locations
- User-generated content style
Review workflow:
- Workspace submits opt-in with their media
- Status becomes "In Review"
- Hub admin reviews submitted creative
- If approved → deployment starts
- If changes needed → workspace notified to resubmit
Existing Posts (Boosted Posts)
Workspaces select existing organic posts from their Facebook/Instagram pages to use as ad creative.
Pros:
- Leverages proven content (posts that already performed well)
- Authentic, already-published content
- Easy for workspaces (no new creative needed)
Cons:
- Limited to what's already posted
- Quality depends on workspace's organic posting
- Blocks Deploy Immediately mode
Best for:
- Boosting successful organic content
- Social proof campaigns
- When workspaces have strong organic presence
Creative Mode Decision Guide
| Scenario | Recommended Mode |
|---|---|
| Brand-wide promotion with pro creative | Playbook-Level |
| Local store grand opening | Workspace-Level |
| "Meet our team" campaign | Workspace-Level |
| Boosting a viral post | Existing Posts |
| Time-sensitive launch | Playbook-Level |
| Pilot testing creative | Playbook-Level |
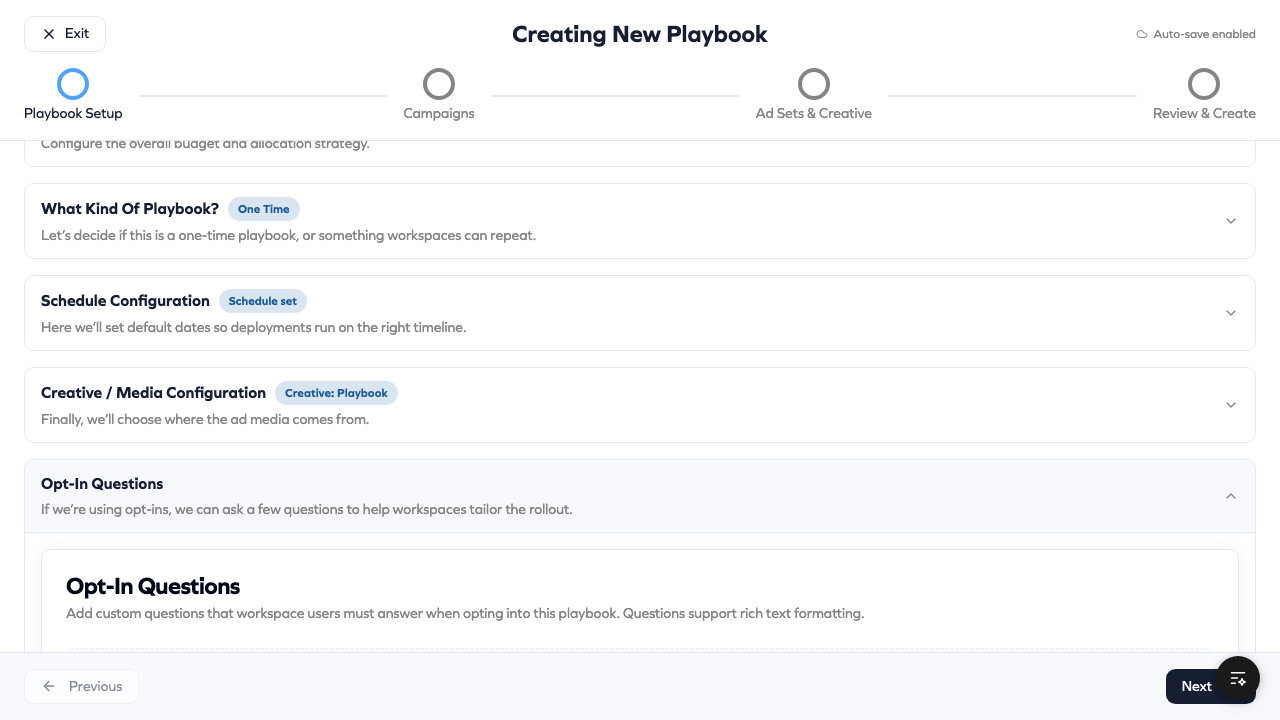
1.8 Opt-In Questions (Optional)
Add questions that workspaces answer when opting in. Responses help you understand each location's needs and can inform campaign customization.
Question Types
Short Answer — Free-form text response.
- "What's your store's specialty?"
- "Describe your local market in 2-3 sentences."
- "What promotion are you running?"
Single Select — Choose one option from a list.
- Minimum 2 options required
- Example: "What's your busiest day?" → Mon/Tue/Wed/Thu/Fri/Sat/Sun
Multi-Select — Choose multiple options.
- Minimum 2 options required
- Example: "Which services do you offer?" → [Service A] [Service B] [Service C]
Building Questions
- Click "Add Question"
- Enter the question text
- Select question type
- For Single/Multi-Select, add your options
- Toggle "Required" if the answer is mandatory
- Drag to reorder questions
Example Questions by Use Case
Grand Opening Campaign:
- "What date is your grand opening?" (Short Answer, Required)
- "Will you have special offers?" (Single Select: Yes/No)
- "What makes your location unique?" (Short Answer)
Lead Generation Campaign:
- "What's your primary service?" (Single Select)
- "What's your average customer value?" (Single Select: ranges)
- "How quickly do you follow up on leads?" (Single Select)
Seasonal Promotion:
- "What products are you featuring?" (Multi-Select)
- "Do you have inventory for increased demand?" (Single Select: Yes/No)
Responses appear in your opt-in dashboard and help you understand franchise participation.
1.9 Notification Preferences
Configure email notifications when workspaces opt in.
Email Hub Admins on Opt-In
Toggle ON to receive emails when workspaces opt into this playbook.
When enabled:
- Hub admins receive notification emails
- Useful for tracking participation in real-time
- Good for high-priority campaigns
Specify Recipients:
- By default, all hub admins receive notifications
- You can select specific people to receive emails instead
- Useful when different admins manage different playbooks
Silence All Playbook Emails (Advanced)
Toggle ON to suppress ALL emails related to this playbook. Useful for:
- Testing playbooks before launch
- Internal pilot campaigns
- Development/staging environments
Silencing emails affects everyone—workspaces won't receive deployment confirmations either. Only use this for testing.
Step 2: Campaigns
Configure the campaign structure. A playbook can have 1-10 campaigns.

Campaign Structure
Most playbooks have a single campaign. Multiple campaigns are useful when:
- Different objectives (awareness + traffic)
- Different audiences in separate campaigns
- A/B testing campaign strategies
- Different budget allocations
Adding Campaigns
Click Add Campaign to create additional campaigns. Each campaign is independent with its own:
- Objective
- Budget allocation
- Ad sets
You can also Duplicate an existing campaign to copy its settings, then modify.
Campaign Settings
Campaign Name
The name that appears in Meta Ads Manager. Use descriptive names.
For shared ad accounts (multiple workspaces share one ad account):
Include {{location_name}} in the name to distinguish per workspace.
- Example:
Summer Sale - {{location_name}} - Becomes: "Summer Sale - Downtown Store", "Summer Sale - Mall Location"
For dedicated ad accounts (each workspace has their own): Simple names work fine.
- Example: "Summer Sale Campaign"
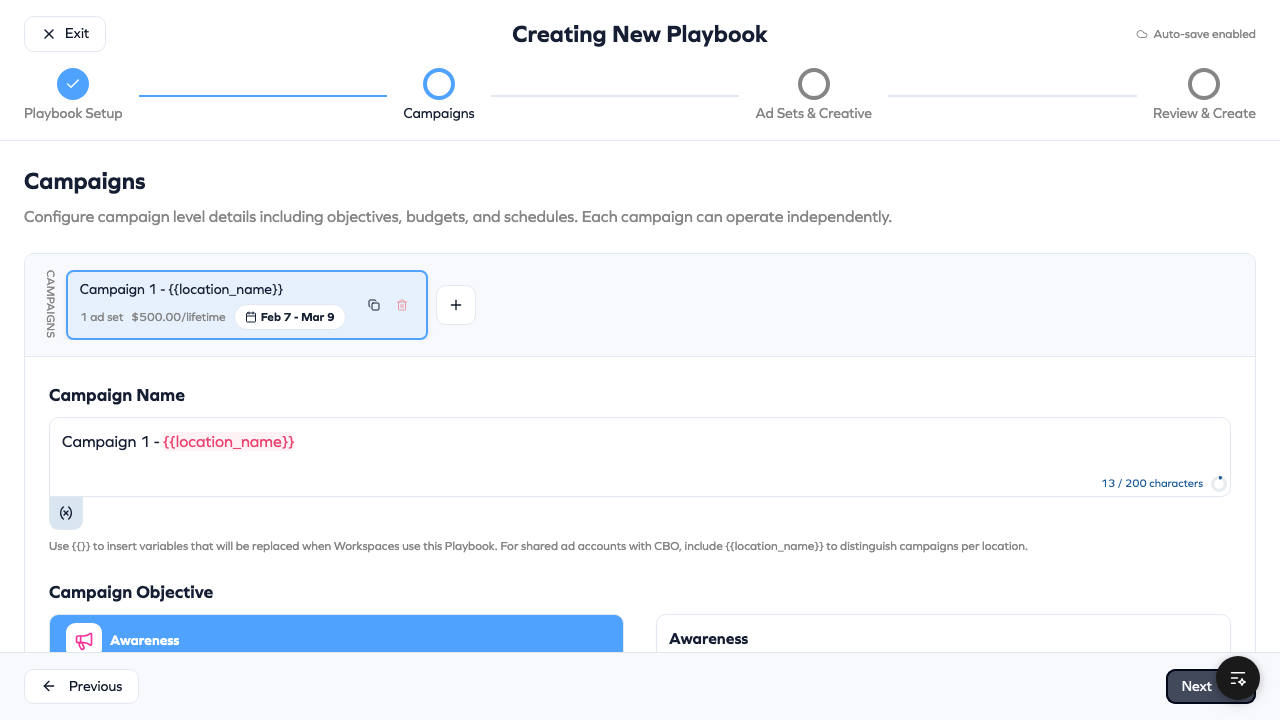
Campaign Objective
What you want to achieve. This affects available optimization goals and call-to-action buttons.
| Objective | What It Optimizes For | Best For |
|---|---|---|
| Awareness | Reach and impressions | Brand building, new market entry |
| Traffic | Link clicks | Website visits, landing pages |
| Engagement | Likes, comments, shares | Social proof, content amplification |
| Leads | Form submissions | Lead generation, signups |
| App Promotion | App installs | Mobile app downloads |
| Sales | Purchases and conversions | E-commerce, bookings |
Start with your business goal, not the objective name. Want more website visitors? → Traffic. Want people to buy? → Sales. Want contact info? → Leads.
Special Ad Categories
Required if your ads relate to:
- Housing — Real estate, mortgages, home insurance
- Employment — Job listings, career opportunities
- Credit — Loans, credit cards, financial services
- Social Issues/Elections/Politics — Political ads, social causes
Selecting a category limits targeting options to comply with Meta's non-discrimination policies. You cannot target by age, gender, or zip code in these categories.
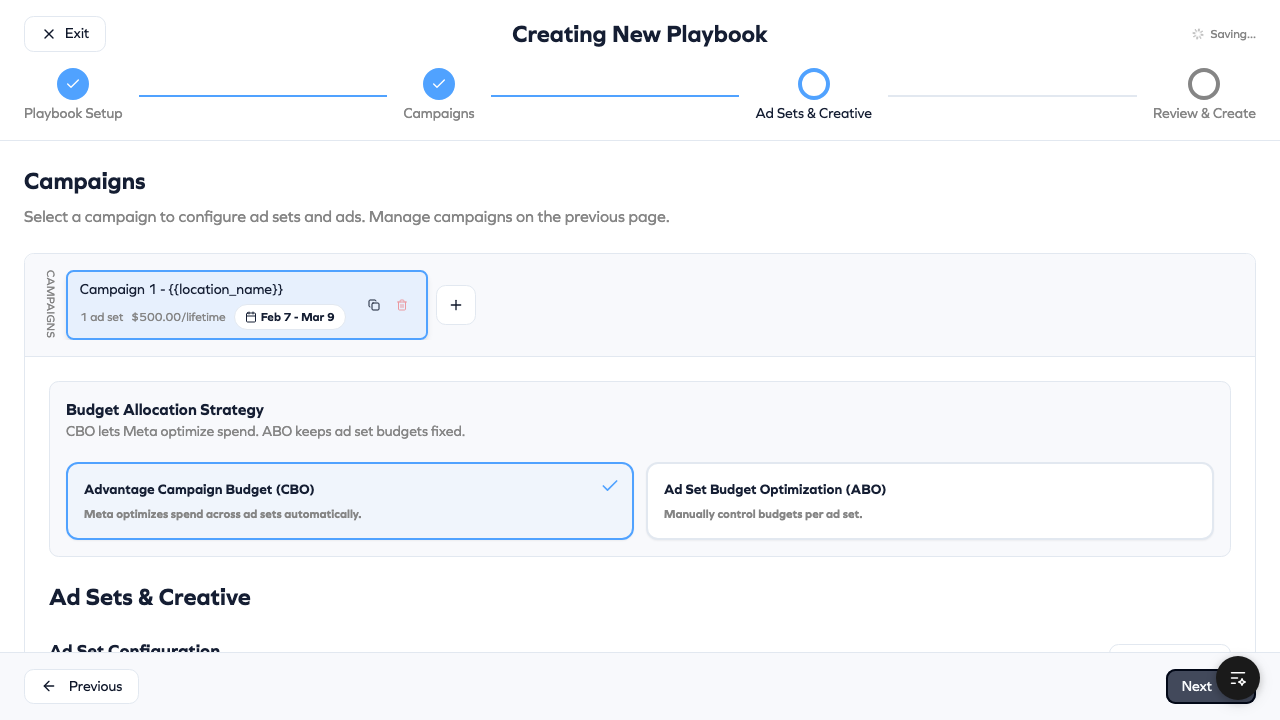
Campaign Budget Allocation
How to split budget across ad sets within this campaign:
CBO (Campaign Budget Optimization) — Recommended
- Budget set at campaign level
- Meta automatically distributes to ad sets
- Meta's AI finds the best-performing ad sets
- Less manual control, often better results
ABO (Ad Set Budget Optimization)
- Budget set per ad set
- You control exactly how much each ad set gets
- More manual control, requires optimization knowledge
- Use when you know specific ad sets need specific budgets
| Strategy | Who Controls | Best For |
|---|---|---|
| CBO | Meta's AI | Most campaigns, beginners |
| ABO | You | Advanced users, specific needs |
Step 3: Ad Sets & Creative
Configure targeting (who sees ads) and creative (what they see).

Ad Set Configuration
Ad sets define your audience. Each campaign can have multiple ad sets targeting different people.
Ad Set Name
Like campaign names, include {{location_name}} for shared ad accounts.
Optimization Goal
What Meta optimizes delivery for. Options depend on campaign objective.
For Traffic campaigns:
- Link Clicks — Optimize for clicks
- Landing Page Views — Optimize for page loads (filters accidental clicks)
For Sales campaigns:
- Conversions — Optimize for purchases
- Value — Optimize for highest purchase value
For Leads campaigns:
- Leads — Optimize for form submissions
- Conversion Leads — Optimize for leads that convert
Destination Type
Where people go when they click:
- Website — Your website URL
- App — Mobile app
- Facebook — Facebook page
- Instagram Profile — Instagram profile
- Messenger — Messenger conversation (not currently supported in playbooks)

Targeting Strategy
How location targeting is determined:
Ads Configuration — Uses audience types you've defined in Ads Configuration.
- Hub pre-defines targeting for different audiences (e.g., "Local", "Lookalike", "Retargeting")
- Each workspace uses their configured audience settings
- Most controlled, recommended for most use cases
Manual — Hub specifies exact location coordinates in the playbook.
- Fixed targeting for all workspaces
- Use for specific geographic campaigns
Targeting Settings
Age Range — 18-65+ (Meta default). Narrow if your product/service has a specific demographic.
Gender — All, Men, or Women. Most campaigns should target All unless product-specific.
Location Radius — How far from each workspace location to target.
- Typical: 10-25 miles for local businesses
- Dense urban areas: 5-10 miles
- Rural areas: 25-50 miles
Workspaces can customize their radius (within 1-50 miles) if your settings allow.
Detailed Targeting — Interests, behaviors, demographics.
- Interests: Fitness, Food & Dining, Travel, etc.
- Behaviors: Purchase behavior, device usage
- Demographics: Education, job titles, life events
Advantage+ Audience — Meta's AI-expanded targeting.
- 0 = Strict targeting (only your defined audience)
- 1 = Allow Meta to expand beyond your targeting if it improves results
For most campaigns, start with broader targeting and Advantage+ enabled. Meta's AI is good at finding the right people. Narrow targeting only when you have specific requirements.
Conversion Tracking
For Sales/Leads objectives, configure tracking:
Pixel ID — Your Meta Pixel for tracking website events. Typically configured per-workspace in Ads Configuration.
Custom Event Type — What event to optimize for:
- Purchase
- Lead
- Add to Cart
- Complete Registration
- Custom events
Custom Conversion ID — For custom conversion tracking beyond standard events.
Ad Configuration
Each ad set contains one or more ads. Ads are what people actually see.
Ad Name
Include {{location_name}} for shared ad accounts.
Creative Type
Manual — You specify exact image/video with exact copy.
- Full control over what shows
- One combination per ad
- Best when you know exactly what works
Dynamic — Provide multiple options; Meta tests combinations.
- Up to 5 headlines
- Up to 5 primary text options
- Up to 10 images/videos
- Meta finds winning combinations
- Best for testing at scale
Flexible — Multiple manual creative variations.
- Define several complete ad variations
- Meta rotates them
- Middle ground between Manual and Dynamic
Media Selection
For Playbook-Level creatives:
- Upload images and videos from your media library
- Recommended sizes:
- Images: 1080x1080 (square), 1200x628 (landscape)
- Videos: 1080x1080 or 9:16 vertical, under 15 seconds recommended
For Workspace-Level creatives:
- Add a media note explaining what workspaces should upload
- Example: "Upload a photo of your storefront or team"
Copy Fields
Primary Text — The main ad copy. This is what people read first.
- Keep under 125 characters to avoid truncation
- Include a clear call-to-action
- Mention your offer or value proposition
Headline — Bold text below the image.
- Keep under 40 characters
- Make it punchy and action-oriented
Description — Optional additional text.
- Appears below headline in some placements
- Provides supporting details
Call-to-Action Button
The button text. Options depend on campaign objective:
| Objective | Common CTAs |
|---|---|
| Traffic | Learn More, Shop Now, Get Quote |
| Leads | Sign Up, Get Offer, Subscribe |
| Sales | Shop Now, Buy Now, Get Offer |
| Awareness | Learn More, See More |
URL Parameters
Add tracking parameters to your destination URL:
utm_source=meta
utm_medium=paid
utm_campaign={{playbook.name}}
utm_content={{campaign.name}}
Available variables:
{{workspace.name}}— Location name{{playbook.name}}— Playbook name{{campaign.name}}— Campaign name
Step 4: Review & Create
Final review before publishing.
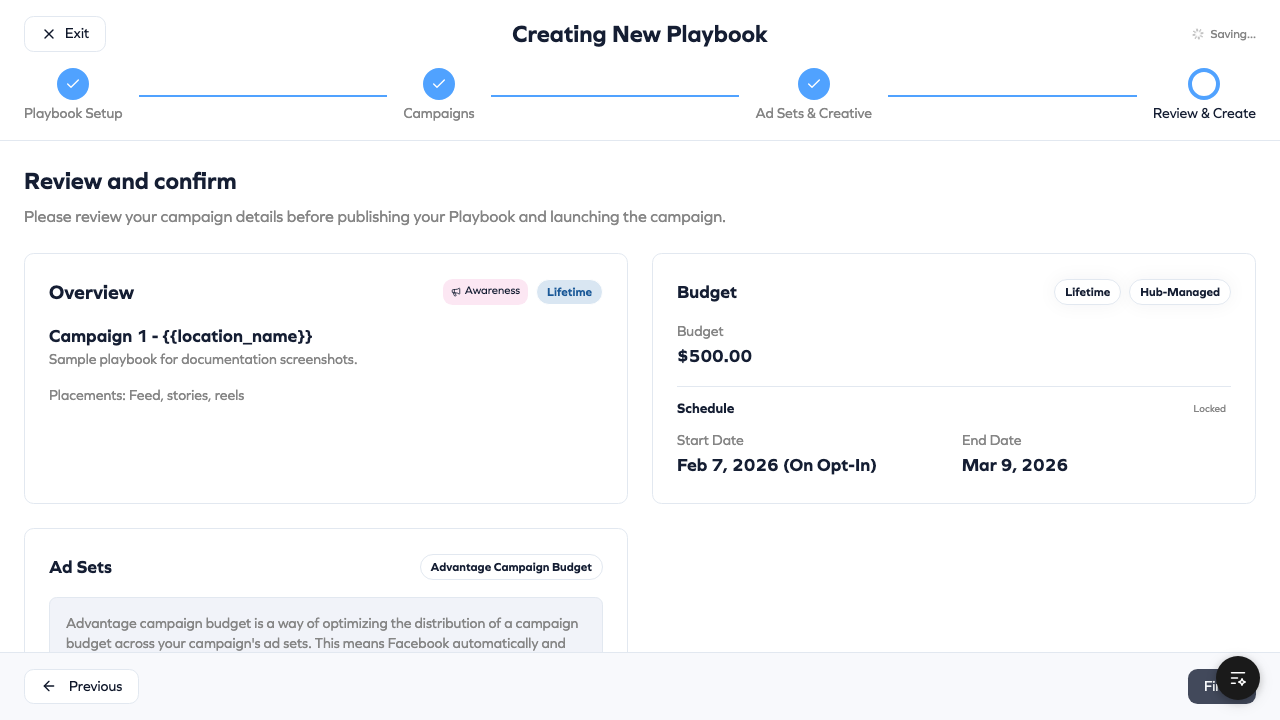
Review Checklist
The review screen shows a summary of your entire playbook:
Playbook Summary
- Name and description
- Access settings (all workspaces or specific)
- Launch mode (opt-in or deploy immediately)
- Playbook type (one-time or evergreen)
Budget Summary
- Total budget per workspace
- Budget type (daily or lifetime)
- Campaign allocation percentages
- Workspace budget control status
Schedule Summary
- Start and end dates (if set)
- Workspace schedule control status
- Duration settings (for evergreen)
Campaign Structure
- Number of campaigns
- Objective per campaign
- Number of ad sets per campaign
- Number of ads per ad set
Creative Preview
- Preview of ad creative
- Copy text
- Call-to-action buttons
Pre-Launch Checklist
Before publishing, verify:
- Name is clear — Workspaces understand what this is for
- Description is helpful — Explains goal and timing
- Access is correct — Right workspaces can see it
- Budget makes sense — Appropriate for your markets
- Schedule is right — Dates align with promotion
- Creative is approved — Images/copy are brand-compliant
- Tracking is configured — Pixel and events are set up
- Questions are clear — (If using) Workspaces understand what to provide
Launch Options
Save as Draft — Save progress without making visible to workspaces. Return later to finish.
Publish — Make playbook visible to workspaces. For opt-in playbooks, workspaces can start opting in immediately.
For Auto-Deploy playbooks: After publishing, you'll see the deployment workspace table showing which workspaces will receive the campaign.
What's Next?
After creating your playbook:
- Manage your playbook — Monitor opt-ins, send reminders, review creative
- View performance — Track results in Command Center
- Share with workspaces — Let franchisees know about the new playbook
For workspace users, see Opting Into Playbooks.